
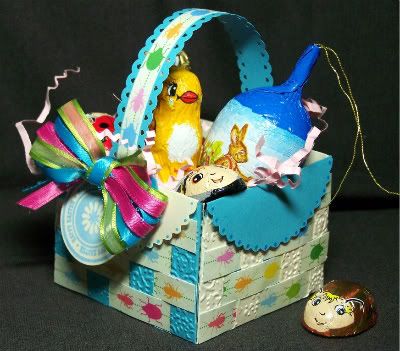
 Easter bags or baskets are filling The Cuttlebug Spot this week! Easter fun is such a sweet way to jump into Spring. The weather is getting nice, flowers are blooming, sweet smells fill the air, color is popping around you and there is TONS of candy in the stores!!! LOL My son is thrilled for Easter this year. Our challenge gave me the oppertunity to create a special little basket for him. We found these adorable Lyndt Bug & Bees chocolates a while ago. I didn't know what I'd do with them to make them a little more special then others until today! The beetle paper is from the Spring DCVW stack cut into strips, woven into envelopes cut from Cricut's Wild Cards. I was searching for a little basket 'help' today and came across a SU tutorial at Beauty Lies Within for this great woven basket using the Big Shot Envelope plate. I don't have Big Shot nor the plate so I had to put my thinking cap on and improvise! The envelope (Carraige) on page 76 worked perfect!
How to make the basket~
-Cut 8 envelopes at 3 inches for a square basket. You can add 2 more to mimic the SU basket with 6 sides.
-Using 4 envelopes to make basket: Cut top of envelope scalloped edge flap off.
-Score sides and fold in.
-Cut from top and bottom folds at: 1/2″, 7/8″, 1-3/8″, 1-7/8″, 2-3/8″, and 2-3/4″.
-This will give you 7 'sections' separated by your cut lines. Cut out section 2, 4 and 6. You will have 4 left (2 at either end and 2 in the center).
-Cut your designer paper in 1/2" by 3" strips. I used 4 strips per side.
-Weave between envelope sections, using adhesive to keep in place. I used photo squares. They were easy to apply and nearly the same size as each strip. Some strips will a little smaller because of my paper choice so I just folded or cut them as needed.
-Add adhesive to each side flap and stick them together to form your box shape. Add adhesive to bottom and fold up. The box frame is done.
To add the scallop edges and cover the top of your box edge:
-Score remaining 4 envelopes so the top flap will fold over.
-Cut the envelopes flap edges off.
-Fold envelope scallop flap over and measure from fold line 2 3/4", cut.
-Add adhesive to each. Adhere inside of the basket, covering weave, fold flap over and stick on outside weave.
This made the basket a lot more sturdy inside and out as well as adding the cut scallop edge.
I placed the finished handle with adhesive and a brad on both sides.
Whew! I sure love the way it turned out and it feels really strong. Liam will love it!
Cuttlebug A2~ Textile
Cricut~ Wild Cards: Carraige 3"
Paper~ DCVW Spring stack
Border Punch~ Martha Stewart
Stamp~ Studio G: Spring block stamps from Michael's
Misc~ Ribbons, Around The Block Paper Tagger to hold circular tag onto basket


5 comments:
You did a wonderful job on this! Love how you woved (?) the different papers, the circles to cover the top edges - and the candies insido too!LOL
Hugs,
Kathrin aka Kruemel
WOW! A lot of work went into that basket, and it sure shows! I love the bug theme!
Super cute... love it all the way...HUGS...SK :)
Your basket came out great! So nice and even and square! I have that same "bug" paper but haven't known what to use if for yet. I like how you were able to cut it into strips for your weaving. Very nice!
urban bike
小折
水晶
隔熱紙
汽車隔熱紙
Post a Comment